How to Budget Your Life Without Spending a Dime
Taking care of yourself financially should be simple: Spend less than you make. But it's easier to repeat that rule than follow it. Plenty of apps can help you manage a monthly budget. But if you're looking to save a few bucks — how admirably frugal of you! — you can do the job with an easy spreadsheet instead.
This example uses Numbers, but you can apply the same rules and coding to any spreadsheet, including Google Sheets and Microsoft Excel. The following steps will take a few minutes to follow, but once you're done, you'll have a powerful, flexible budget spreadsheet you can use month after month.
1. Give yourself room to work.
Create a new spreadsheet in Numbers, then use the extender buttons at the end of the horizontal lettered row at the top of the sheet, and the bottom of the vertical numbered row on the left side of the sheet, to expand the sheet's dimensions.
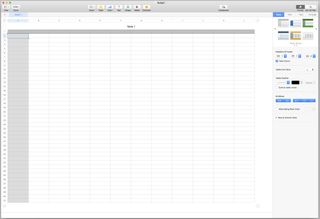
Drag the horizontal letters out to column L, and the vertical numbers down to at least row 40. You'll eventually record every credit card purchase or ATM transaction you make in a given month, so you might need the extra rows.
2. Write down your essential expenses.
We'll start by creating an estimated budget — your best guess at your monthly expenses and income. Even if it doesn't exactly reflect your monthly spending, it'll provide a good baseline for comparison. And it'll give you a place to experiment with different ways to parcel out your cash.
In cell A1, write "Expenses." Below that, use column A to list every category of regular expense you pay each month: Rent, groceries, utility bills, even subscription services like Netflix or Hulu. If you get a bill for it every single month, list it here.
In cell B2, write "Budget." Then list the dollar amounts for each of your expenses in column A. Some, like rent payments, should be easy to predict. For others, like utilities, provide your best ballpark figure — ideally, a worst-case scenario of the largest amount you can imagine paying for that expense in a given month.
Master your iPhone in minutes
iMore offers spot-on advice and guidance from our team of experts, with decades of Apple device experience to lean on. Learn more with iMore!
I budget my electric bill based on the peak amounts I spend in winter, even though I spend far less on average. Better to plan for the worst and have more money left over, than assume the best and get caught short.
When you're done listing expenses and budgeted costs, give yourself a few extra rows to add more in the future — you never know when you might need to add, say, a new car payment or a contribution to a child's college fund.
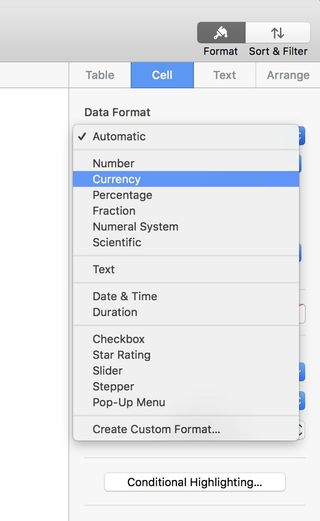
Go up and click on the column header — the one labeled "B" — to select the entire column. Then, over on the right of the Numbers window, click Cell, and under Data Format, select "Currency."
This will make sure Numbers treats any number you enter as a dollar amount, whether you include a $ sign or not. (Going forward, you'll want to repeat this for every column where you'll be listing dollar figures.)
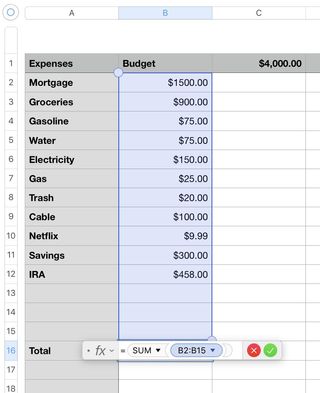
Label one last cell in column A "Total." Select the cell right next to it in column B, then hit the equals sign = key to create a formula.
Type sum and hit Return; the SUM function tells the spreadsheet to add up everything in a given range of cells.
Then click and hold on cell B2, drag down to just above the cell you've put the function in, and hit Return (or click the little green check mark button next to the function) again.
You'll see the total dollar amount of all your budgeted spending. Change any of the dollar amounts above, and this number will update automatically.
3. See how much money you'll have left each month.
Select column C, format it for Currency, then enter the amount of money you expect to make each month in cell C1.
If you earn a salary, this should be fairly easy to calculate. Enter the amount you receive in paychecks every month.
If you get paid the same amount on a weekly or biweekly basis, multiply the amount of one paycheck by the number of paychecks you get every year (52 weekly, or 26 biweekly), then divide that number by 12 to get your monthly average.
If you get paid by the hour, and work different hours every month, pick the lowest reasonable number you can think of, just to be safe.
Now we're going to subtract each budgeted amount from that total, and show your remaining money in the next empty cell in column C.
Start by selecting cell C2. Type = to create a new function. Click cell C1 — you'll see $C1 appear in the function. Then type a minus sign -, and click cell B2.
Now click on the little downward arrow next to $C1, then uncheck "Preserve Row" and check "Preserve Column." Hit Return to finish the function.
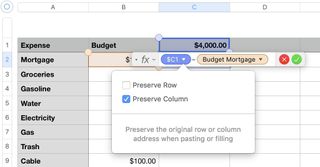
Making that switch will help Numbers calculate the total correctly when you duplicate that formula for all the rows beneath it.
To do so, select cell C2, then move your mouse to the blue border along the bottom of the cell. See that little yellow dot appear? Grab it and drag it down to cover the rest of the rows in your budget.
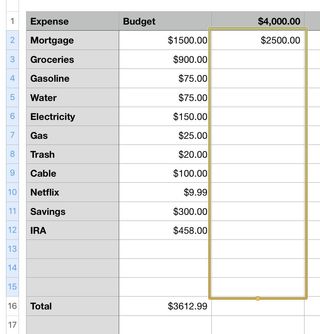
When you release it, Numbers will subtract each item in your budget from your initial pile of money. You can watch that figure shrink as you go down the list. Whatever's left at the bottom is your budget for disposable income.
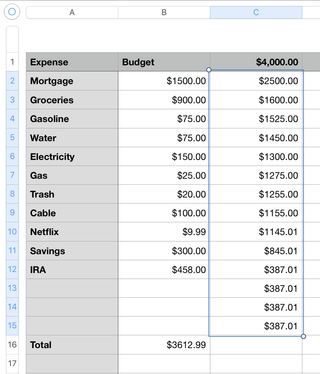
4. Do it all again, but for real this time.
Now that you've mapped out an ideal budget, you need to compare it to how much you actually spend each month.
Label column D "Expense" again, and beneath it, add all the same budget line items you entered in column A.
Label column E "Actual," and enter every dollar amount from your budget in column B that doesn't change from month to month — so, most likely your rent or mortgage, your cable bill, any subscription service bills, and any amounts you put into some form of savings.
For utilities, enter the amounts from your most recent bills. If you get new bills during the month, you can always update these figures. For now, you just want a rough idea of what to expect.
Gas and groceries usually involve a lot of little expenses over the course of the month, so we'll soon set something up to make accounting for them easier. For now, leave them blank.
Once you're done, go to column F, and use the same trick from column C.
Put your monthly income in cell F1. (If you know the exact amount you'll make each month, you can select F1, type = C1, and hit Return, and any number you enter in C1 will automatically show up in F1, too.)
Then, in cell F2, create a new function, select cell F1, type -, then select cell E2.
Click the little arrow next to $F1 in the function, swap "Preserve Row" for "Preserve Column," and finish the function. Drag down from the little yellow dot at the bottom of cell F2 to cover the rest of the rows of expenses.
Now, for gas and groceries. In column D, a few cells below the other items, label a cell "Groceries," and beneath it, create labels for five weeks' worth of groceries. (Once you enter "Week 1," you can drag downward via the yellow dot, and Numbers will fill in the rest of the weeks on its own.)
Go one cell farther down in column D, and do the same thing for "Gasoline." You know best how often you fill up your car; if you gas up once a week or more, you'll need more slots than if you barely drive at all. (If you don't own a car, you can either skip this, or use the same idea for bus or train passes, if you need to.)
All done? Go back up to the blank spots you left for gas and groceries in column E. Select the cell for groceries, then type =SUM, then select all the cells in column E next to your five weeks of groceries, and hit Return.
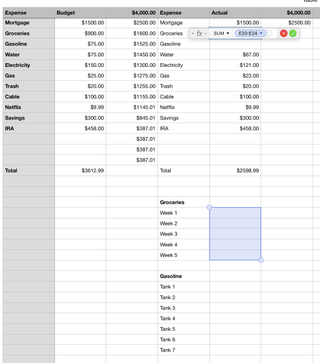
When you're finished, do the same for gas. Now your budget will automatically adjust as you enter each round of grocery and gas receipts.
5. Say hi (and bye) to your disposable income.
With luck, you'll have money left over after paying your bills. You'll track this in columns G and H. Label column G "Other Expenses," and column H "Amount."
Enter descriptions in column G and dollar figures in column H. (Remember to format column H as currency!)
In this section, record every debit or credit transaction you make, every check you write, or every chunk of cash you withdraw from an ATM, that doesn't go toward any of your budget expenses. Go out for Thai food? Order books online? Get $40 from the ATM? Enter it here.
Leave yourself plenty of room here for line items; even or especially if you make a lot of small purchases, they all add up.
After however many rows you think is enough, put "Total" in column G.
In the next cell over in column H, use the SUM function to add up all the rows above it in column H. This will tell you how much of your disposable income you've spent.
Below that, put a label for "Remaining Budget" in column G; over in column H, use a function to subtract your total disposable income spent from the money left over in your budget (the last number in column C). This will show you how much you have left to spend according to your budget.
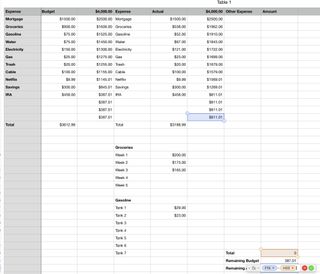
Go one row down and label column G "Remaining Actual," and do the same thing, except with the last number at the bottom of column F. This shows you how much you really have left to spend this month.
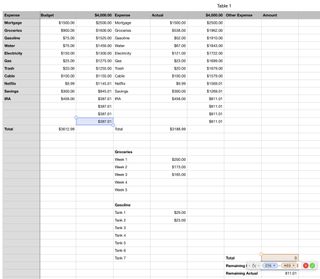
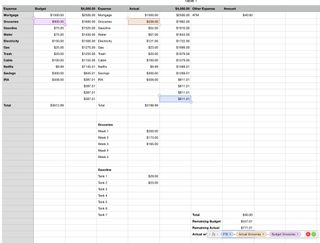
Finally, since your grocery bill makes up a big chunk of your total budget but doesn't get spent all at once, it can help to see about how much you'll have left once your groceries are fully paid for. You'll start with how much money you have left; add back whatever you've actually spent on groceries; then subtract the amount from your budget that you expect to spend on groceries for the whole month.
Go one more row down, put "Actual w/ Food" in column G, and enter this function:
= [Cell containing your Remaining Actual dollar amount] + [Cell from column E containing the sum of how much you've actually spent on groceries so far] - [Cell from column C with your budgeted amount for groceries]
6. Multi-person budgeting
Just budgeting for yourself? Congratulations! You're all done. But if you have more than one person in your household, read on.
My wife and I split our disposable income fifty-fifty; we each get half of whatever's left after our budget items or joint expenses to spend as we please. If you want to set up something similar, it's easy. In cells I and J, and then K and L, create new Expenses and Amount labels for each person. Use the SUM function to add up how much they've spent. Then, for their Remaining Budget cell, use this function:
[Remaining Budget from column H] / 2 - [that person's total spending amount]
… and do the same for each person's Remaining Actual and Actual w/ Food, dividing the original amounts from column H by two.

Got more than two people to budget for? Divide by the appropriate number. Want to portion out different-sized shares of the budget? Multiply the original amounts from column H by the appropriate percentages.
7. Take care of your budget
Obviously, a budget spreadsheet won't do you much good if you don't use it. Save your receipts when you're out and about, and enter them in your spreadsheet as soon as possible.
Consider storing your spreadsheet in iCloud; that way, you can add expenses on the go from your phone or tablet.
At the end of each month, do some quick standard maintenance. Performing these steps in the following order helps make sure the spreadsheet doesn't get its math mixed up:
- Make sure you've entered all your expenses from the past month.
- Write down or memorize your Remaining Actual figure in column H. (If you've got a multi-person budget, write down the Remaining Actual amounts there, and ignore column H.) If it's positive, you've got money left over. Nice work! Put it into savings (if you're feeling frugal), or just carry it over to next month. If it's negative, you've blown your budget, and you'll have to carry it over.
- Erase any dollar amounts in column H, and in any personal columns next to it. Make sure you don't erase the Total, Remaining Budget, Remaining Actual, or Actual w/ Food cells! Once you delete the cells above them, they'll zero out automatically.
- If you're carrying over any amount, put it at the top of the appropriate column, labeled "From Last Month." If you had money left over, make the dollar amount negative — this will, counterintuitively, add it to your budget for the month ahead. If you ended up in the hole, enter the amount you overspent as a positive number — this will subtract it from your new budget, like any other line item.
- Erase the weekly grocery amounts and tanks of gas at the bottom of column E; once you do, they'll zero out in the Actual section above.
- Now your budget's all set for a new month!
Harness the power of your purse strings
Keeping a budget is the first step toward saving for bigger and better things, like a new Mac, or a fun vacation, or a retirement where you don't have to work until you keel over in aisle 7. And with this simple spreadsheet, you can control your spending, rather than letting your spending control you.
Got any budget tips or tricks of your own? Thought of a way to make this spreadsheet even better? Share it in the comments below!

Nathan Alderman is an iMore contributor. He’s been using Apple computers since his first Apple IIe in 1985, and writing professionally about Macs and their software since 2005. During his 12 years freelancing for Macworld, he covered email clients, web browsers, web design programs, writing apps, and games, and he’s continued to follow those interests at iMore since 2017. An editor and writing coach in his full-time career, he spends his dwindling spare time writing fiction for fun, volunteering for democracy, and contributing to podcasts on The Incomparable Network. Nathan adores his wife and wrangles his alarmingly large children in bucolic Crozet, VA.
Most Popular


